
Play Framework Primer - Scala Forms
23 Jul 2019This is part 3 of a series about basics of Play framework. In part 2, we covered fundamentals of routing.
In this article, we will cover forms in Play framework. I have personally never seen a functioning web application that does not heavily use forms.
Forms are very key in collecting both simple and complex user input and Play provides very solid support for implementing forms in your application
Concept of Data Binding
Data binding is a general computer programming concept that establishes a two way relationship between two different data presentation formats.
When data changes in one format, it is automatically translated into the other format. In Playframework, these format are the UI format which uses a form and the underlying data in models or case objects.
For data binding to happen in Play, there is a library that takes data from a post request, looks for formatted values and bands to a Form object then populates a case object/model.
Dependencies
Playframework bundles some form handling utilities in the play.api.data package.
play.api.datapackage and what is thereplay.api.data.Forms._package and what is there- validation and constraints in
play.api.data.validation.Constraints._
Form handling basics
Introduction
In this section, we will go through the steps of building a simple web application to add users to a list in Playframework that demonstrates the basics of form handling.
Form handling involves form definition, defining constraints as well as validating data against these constraints, displaying the bound form in view templates as well as populating post data in case classes and finally, processing form results/errors in a view template.
We will cover many of these concepts in this article.
First let’s create a new web application using the instructions in this article by running:
sbt new playframework/play-scala-seed.g8 --name=play-forms-basic --organization=io.egimabenwhen we run the application, we should see Welcome to Play! when we visit http://localhost:9000.
We may encounter some new terms and maybe new and confusing concepts here but feel free to ignore these for now or visit the official docs to get a better idea.
Let’s first create the models directory/package as app/models as the template may have come with only app/controllers and app/views. You can do this using intelliJ or the IDE you use.
Form Definition
Let’s also change the name of the controller from HomeController to FormController for consistency with the article, make the appropriate change in the route:
GET / controllers.FormController.indexCreate app/models/User model to hold data in the code:
package models

case class User(name: String, email: String, age: Int)
Add these important imports which form handling depends on:
import play.api.data._
import play.api.data.Forms._
Define a form object in the controller. The form object is a scala object that creates a new form from a mapping(map of field name to data type).
It also takes apply and unapply methods, luckily for us, we can use the same for User since it’s a case class:
package controllers

import javax.inject._
import models.User
import play.api.mvc._
import play.api.data._
import play.api.data.Forms._

@Singleton
class FormController @Inject()(val controllerComponents: ControllerComponents) extends BaseController {

  val userForm = Form(
    mapping("name" -> text,
      "email" -> email,
      "age" -> number
    )(User.apply)(User.unapply)
  )
  def index() = Action { implicit request: Request[AnyContent] =>
    Ok(views.html.index())
  }
}
With the above step, we have nearly completed one leg of data binding, the next leg is on the UI, it involves enabling the index.scala.html view tempate to display the form.
Showing the form in a view template
To do this, we need a little bit of information about how view templates work, specifically the fact that they use a combination of a scala variant(with @ directives) and html. They take parameters from the controller.
Take a look at how the view template currently looks:
@()

@main("Welcome to Play") {
  <h1>Welcome to Play!</h1>
}
The first line has parentheses prefixed with the @ directive and this is where we inject scala params. The first mandatory param is the form object, empty in this case.
we can have multiple parameters in a view template just like in an ordinary scala method. So we will also add a param containing a list of users from the server, so list and form will be in the same view template for simplicity:
@(userForm: Form[User],users: List[User])(implicit messages: Messages)

@main("Welcome to Play") {
  <h1>Welcome to Play!</h1>
}
As you may have noticed, we have added a second param list which has an implicit parameter: messages. Don’t worry about this for now, we will cover it shortly.
Play provides a suite of helpers for form handling in a view template. This way, we can use scala to create form elements equivalent to html, starting with the form tag as well as all available form elements like input, checkbox, radio buttons etc.
We are also able to add other html attributes just like in an html form. So let’s provide the view template with what it needs to create a form to collect user input for the User model as well as a list (ul) tag to list users:
@(userForm: Form[User],users: List[User])(implicit messages: Messages)
@main("Welcome to Play") {
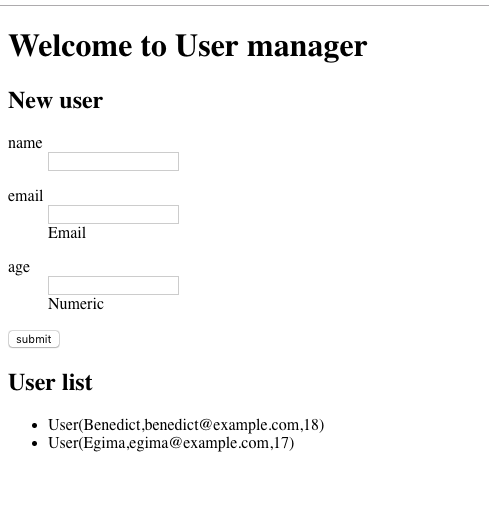
<h1>Welcome to User manager</h1>
<h2>New user</h2>
@helper.form(action = routes.FormController.create()) {
@helper.inputText(userForm("name"))
@helper.inputText(userForm("email"))
@helper.inputText(userForm("age"))
<input type="submit" value="submit">
}
<h2>User list</h2>
<ul>
@for(user <- users) {
<li>@user</li>
}
</ul>
}Notice the minor changes to the headers for consistency with what our page is doing.
The reason we injected Messages is that the form helpers e.g. input, checkbox all take a message provider as an implicit param. This is because they need to provide error messages mapped to the language defined in the request. This is part of play’s internationalization capability.
Message processing in FormController
Back to FormController, we need to make few more changes to complete it. First, let’s modify the controller to make it a real form controller, with the appropriate changes to enable it handle data exchange with the view template.
Inject a MessagesActionBuilder in the controller and let it extend AbstractController instead of BaseController and provide the default injected ControllerComponents as a param to AbstractController.
@Singleton
class FormController @Inject()(messagesAction: MessagesActionBuilder, cc: ControllerComponents) extends AbstractController(cc)
Also, each action handling forms will return the instance of MessagesActionBuilder we injected in the controller as well as take an implicit MessagesRequest instance instead of a Request instance.
 def index() = messagesAction { implicit request: MessagesRequest[AnyContent] =>
    Ok(views.html.index(userForm,users.toList))
  }
We have now amended the view template in the action response and added the parameters we defined earlier. Phew!!!
The last 2 paragraphs are really dense and so much information to process, the summary is that form processing needs to be language aware and the components we have injected, broadyly speaking, expose a messages API that taps into Play’s internationalization capability.
Processing POST request in Controller
We need to create another controller action to process the POST request from the form and add the new user into an in memory database, we will just use a ListBuffer which is a mutable scala list:
def create() = messagesAction { implicit request: MessagesRequest[AnyContent] =>
    userForm.bindFromRequest.fold(
      formWithErrors =>
        BadRequest(views.html.index(formWithErrors, users.toList)),
      userData => {
          users.addOne(userData)
          Redirect(routes.FormController.index())
      }
    )
  }
We are using the bindFromRequest convenience method of the form object which binds it to the post data. We then process the result using the fold method that takes 2 parameters for how to handle both the error case where the form fails to bind and the success case where data binding successed.
Finally, the controller looks like this:
package controllers

import javax.inject._
import models.User
import play.api.mvc._
import play.api.data._
import play.api.data.Forms._

import scala.collection.mutable.ListBuffer

@Singleton
class FormController @Inject()(messagesAction: MessagesActionBuilder, cc: ControllerComponents) extends AbstractController(cc) {

  val userForm = Form(
    mapping("name" -> text,
      "email" -> email,
      "age" -> number
    )(User.apply)(User.unapply)
  )

  val users = new ListBuffer[User]()

  def index() = messagesAction { implicit request: MessagesRequest[AnyContent] =>
    Ok(views.html.index(userForm,users.toList))
  }
  def create() = messagesAction { implicit request: MessagesRequest[AnyContent] =>
    userForm.bindFromRequest.fold(
      formWithErrors =>
        BadRequest(views.html.index(formWithErrors, users.toList)),
      userData => {
          users.addOne(userData)
          Redirect(routes.FormController.index())
      }
    )
  }
}
Routing requests to controller
To complete the implementation, we will add the POST route in the routes file:
GET     /                           controllers.FormController.index
+nocsrf
POST     /create                           controllers.FormController.create
GET     /assets/*file               controllers.Assets.versioned(path="/public", file: Asset)
We have applied a modifier +nocsrf to the route to by pass the protective check for a csrf token in the request.
Testing
We can test the application by visiting https://localhost:9000. We should be able to add users in the form and when submitted, should be displayed in the user list section.
The page should be looking like this:
Conclusion
In this article, we have explored basics of forms in Play framework by building a working list application. There may have been several new concepts and things that don’t make sense.
I hope the aspect of building a complete app can act as a starting point to explore more about forms from the official documentation. The complete source code is available on github